Sunday, August 23, 2009

MODELING OF CHAIR IN 3D MAX

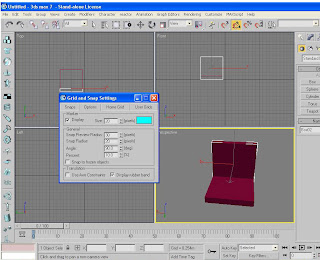
First we drag a box from the top view. Then we make a copy of box by pressing angle snap toggle and change the value of angle to 90 as we see in the picture 1 ( a )


Now we have to create a chair base we select a box and drag the box from the top view as wee see in the picture 1 (b)


Now chair is complete time for texture on the chair we press m and go to bitmap and select any fabric material and apply on chair as we see in picture 1 (c)

Patch and Nurbs Modeling

3- Patch Modeling:

A patch is an area of a patch object, defined by three or four surrounding edges and vertices. Controls described in this topic let you manipulate a patch object at the patch level. As well as moving and rotating patches, you can create a separate element by holding down the SHIFT key during a move operation. This creates a separate element of the selected patches

4-NURBS Modeling:

NURBS (Non-Uniform Rational B-Splines) are a technique for interactively modeling 3D curves and surfaces

Surface Modeling

2- Surface Modeling:

Surface modeling is more free form than geometric (parametric) modeling. Although you can create Patch and NURBS primitives from the Create panel, more often a surface model begins when you use the quad menu or the modifier stack to “collapse” a parametric model to some form of editable surface. Once you have done so, a variety of tools let you shape the surface. A lot of surface modeling work is done by editing sub-objects of the surface object.

Box Modeling

1- Box Modeling:

Box Modeling is all about Edit Poly.
EDIT POLY

The Edit Poly modifier provides explicit editing tools for different sub-object levels of the selected object: vertex, edge, border, polygon, and element.
Vertex—Accesses the Vertex sub-object level, which lets you select a vertex beneath the cursor; region selection selects vertices within the region.
Edge—Accesses the Edge sub-object level, which lets you select a polygon edge beneath the cursor; region selection selects multiple edges within the region.
Border—Accesses the Border sub-object level, which lets you select a sequence of edges that borders a hole in the mesh.
Polygon—Accesses the Polygon sub-object level, which lets you select polygons beneath the cursor. Region selection selects multiple polygons within the region.
Shrink—Reduces the sub-object selection area by unselecting the outermost sub-objects. If the selection size can no longer be reduced, the remaining sub-objects are unselected.
Grow—Expands the selection area outward in all available directions.
For this function, a border is considered to be an edge selection.
Ring—Expands an edge selection by selecting all edges parallel to the selected edges. Ring applies only to edge and border selections.
Loop—Expands the selection as far as possible, in alignment with selected edges.
Soft Selection rollout
Soft Selection controls apply a smooth falloff between selected sub-objects and unselected ones. When Use Soft Selection is on, unselected sub-objects near your selection are given partial selection values. These values are shown in the viewports by means of a color gradient on the vertices, and optionally on the faces.

LOFT

Lofting is an important method for 3D object creation. You create shape objects to serve as a path and any number of cross-sectional shapes. The path becomes the framework that holds the cross-sections forming your loft object.

The lofting process first requires that you create shape objects to serve as the path and cross-sections of your loft object.
Get Path—Assigns a path to the selected shape or changes the current assigned path.
Get Shape—Assigns a shape to the selected path or changes the current assigned shape.
Tip: Hold down CTRL while getting the shape to flip the direction of the shape's Z axis.

LATHE

Lathe creates a 3D object by rotating a shape or NURBS curve about an axis.
Degrees—Determines the number of degrees that the object is spun around the axis of revolution (0 to 360, default=360). You can set keyframes for Degrees to animate the circular growth of a lathed object. The Lathe axis auto-sizes itself to the height of the shape being lathed.
Segments—Determines how many interpolated segments are created in the surface between the start and endpoint. This parameter is also animatable. Default=16
Capping group
Controls whether or not caps are created for the interior of the lathed object if Degrees is set to less than 360.
Direction group
Sets up the direction of the axis of revolution, relative to the pivot point of the object.
X/Y/Z—Set the direction of the axis of revolution relative to the pivot point of the object.
Align group
Min/Center/Max—Align the axis of revolution to the minimum, center, or maximum extents of the shape
Modeling

Modeling in 3D can be likened to sculpting. Many different techniques can be used to create the objects in your scene. The techniques you learn are adaptable to any style of modeling you need to perform. For instance, if you're building models that will be incorporated into a game, you'll be most interested in low polygon modeling techniques. The same techniques will be equally beneficial when building highly detailed models for architectural presentations or motion pictures.
We can catagories Modeling in these four catagories:


1- Box Modeling;
2-Surface Modeling;
3-Patch Modeling;
4-NURBS Modeling.

Saturday, August 1, 2009

Animation of 3d studio max

ANIMATION OF 3D MAX

With 3ds max, you can create 3D computer animation for a variety of applications. You can animate characters or vehicles for computer games, or you can animate special effects for film or broadcast. You can create animation for serious purposes such as medical illustration or forensic presentation in the courtroom. Whatever reason you have to animate, you'll find 3ds max a capable environment for achieving your goals.
The basic way to animate is quite simple. You animate the transform parameters of any object to change its position, rotation, and scale over time. Turning on the Auto Key button, and then moving the time slider places you in a state in which any changes you make will create animation for the selected objects in the view port.
Animation is used throughout 3ds max. You can animate the position, rotation, and scale of an object, and almost any parameter setting that affects an object's shape and surface. You can link objects for hierarchical animation, using both forward and inverse kinematics, and you can edit your animation in Track View.
This section discusses the basics of creating animation. It looks briefly at a comparison between computer animation and classic hand-drawn animation, and then describes the creation of key framed animation

3ds max is not limited to animating transformations (such as position, rotation, and scale). It can animate just about any parameter you can access. Thus, you can animate modifier parameters, such as a Bend or a Taper angle, material parameters, such as the color or transparency of an object, and much more
3ds Max is the most widely-used off the shelf 3D animation program by content creation professionals it is mostly used by video game developers, TV commercial studios and architectural visualization studios. It is also used for movie effects and movie pre-visualization. In one second there
Is 24 frames. Animation basically not really consist it’s an illusion of our eyes. If one object moves in 24 frames so there is 24 images on 24 frames to understand the animation of 3d studio max we got to understand following points.
Which are?

(1)Auto key
(2)Scripting
(3)Slice plane
(4) Wire parameters
(5)Gizmo
(6)Curve editor
(7)Camera
(8)Melt
Etc

About Animation

ANIMATION
As we known the term animation is generally used for the movement, rotation and scaling. In this sense we could say animation is all about movement of objects
Animation is a type of optical illusion. It creates 24 frames per second. It involves the appearance of motion caused by displaying still images one after another. Often, animation is used for entertainment purposes.
Cartoon animation is often considered to be animation in its classic form. The animated cartoon made its debut in the early part of the 20th century and calls for the use of 24 different drawings per second. In traditional animated cartoons, frames are hand drawn.
Animation is both time-consuming and costly to produce. For this reason, most of the animation made for television and film is produced by professorial studios. However, there are also many independent studios. In fact, there are many resources, such as lower-cost animation programs and distribution networks that make the work of the independent animator much easier than it was in the past.
When animation is used for films or movies, each frame is produced on an individual basis. Frames can be produced using computers or photographs of images that are either drawn or painted. Frames can also be generated by altering a model unit in small ways and using a special camera to take pictures of the results. No matter what method is used, the film or movie that results fools the eye into seeing continuous movement.
Persistence of vision is often projected as the reason the eyes can be fooled into seeing continuous movement that isn't really happening. Basically, the brain and the eyes cooperate, storing images for a mere fraction of a second. Minor jumps or blips are automatically smoothed out by the brain. Since animation frames are shot at very fast rates, most individuals see the movement without stoppages.
Keep in mind that persistence of vision is a theory and not a proven concept. Many film academics and theorists accept its relevance to animation.
Though the work of producing animated movies and cartoons can be intense and laborious, computer animation can make the process much faster. Computer technology is steadily improving, and professionals are able to create life-like characters using computers and special animation software.
Animation is based on a principle of human vision. If you view a series of related still images in quick succession, your brain perceives them as continuous motion. Each image is called a frame.
Most of the frames in an animation are routine, incremental changes from the previous frame directed toward some predefined goal. Early animation studios quickly realized they could increase the productivity of their master artists by having them draw only the important frames, called key frames. Assistants could then figure out the frames that were required in between the key frames. These frames were (and still are) called teens.
Use the software as your animation assistant. As the master animator, you create the key frames that record the beginning and end of each transformation. The values at these key frames are called keys. The software calculates the interpolated values between each key value, resulting in twined animation.
Early animation studios also had to employ artists to add the ink and color to each frame. Even today, production of a cartoon usually requires hundreds of crafts people and artists to generate the thousands of images. With 3ds max, the rendered takes over the job of shading and rendering each frame and storing it as you direct. The end result is a high-quality finished animation.

Some about animation

ANIMATION

As we known the term animation is generally used for the movement, rotation and scaling. In this sense we could say animation is all about movement of objects.


ANIMATION OF 3D STUDIO MAX

To understand the animation of 3d studio max we got to understand following points.
Which are

(1)Auto key
(2)Scripting
(3)Slice plane
(4)Wire parameters
(5)Gizmo
(6)Curve editor
(7)Camera
(8)Melt
etc